How to Enable or Disable Diagnostic Policy Service in Windows 10
Channel:

Subscribers:
167,000
Published on ● Video Link: https://www.youtube.com/watch?v=74hxpoxkaww

In this video, you will get to know how to Enable or Disable Diagnostic Policy Service in Windows 10.
1. Open Run dialog box by making a joint press of Windows key and R.
2. Type in the command “services.msc” in the empty text field and hit Enter.
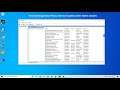
3. On the Services console, find out Diagnostic Policy Service located under Name column.
4. Once found, right-click on the same and select Properties.
5. When a new wizard appears, go to its Startup type area and select either Automatic or Manual using the drop-down menu.
6. After that, hover the cursor to Service status and click the Start button to enable Diagnostic Policy Service. To disable the same, hit the Stop button.
7. Click Apply followed by OK in order to save the changes.
Other Videos By Cap Trong Nam - How To
Tags:
Disable Diagnostic Policy Service
enable Diagnostic Policy Service