How to Change a Network Profile Name in Windows 10
Channel:

Subscribers:
167,000
Published on ● Video Link: https://www.youtube.com/watch?v=0z5DonVUJxA

How to Change a Network Profile Name in Windows 10
This video will show you how to rename a Network Profile Name in Windows 10 using Registry Editor
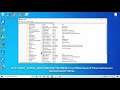
1. Open the Registry Editor and go to
HKEY_LOCAL_MACHINE\SOFTWARE\Microsoft\Windows NT\CurrentVersion\NetworkList\Profiles
2. Select on the long GUID number and look for the ProfileName that matches the network name you are changing. Double-click ProfileName.
3. Enter the new name in the Value data field.
Your new Network name should appear the next time you check your Networks.