How to enable Hyper-V in Windows 10


Hi friends! This video will show you how to enable Hyper-V in Windows 10 either via "Turn Windows Features on or off" window or using Windows PowerShell.
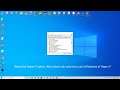
1. Using DISM & Via Windows PowerShell
DISM /online /Enable-Feature /All /FeatureName:Microsoft-Hyper-V
2. Using Turn Windows Feature On Or Off
- Type "Turn Windows Features on or off" in the search box from the Start menu. From results, opt "Turn Windows Features On or Off".
- In the Turn Windows Features on or off window, select the Hyper-V option. Also select sub-options to use all features of Hyper-V. Click OK.
Notes:
- You must be running Windows 10 Pro, Enterprise, or Education edition.
- Your system should have 64-bit processor by AMD or Intel with Second Level Address Translation (SLAT).
- The system must have CPU support for VM Monitor Mode Extension (VT-c on Intel CPUs).
- A minimum of 4 GB memory on your system.
- You must have virtualization technology enabled in BIOS settings of your computer.