Making my own custom keycaps using my DIY 3018 pro laser

So ever since I got my hands on a k95 platinum keyboard I set up some custom marco's on the extra buttons that it has. However my previous attempt at making custom keys for it failed. I cut out vinyl stickers and spray panted over them. However cutting small logo's (10x10 mm) didn't work very well and have me a lot of problems. Painting them once I had a decent cut was a pain and a half as well.
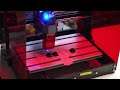
I recently build myself a CNC 3018 laser. The 3018 parts I was slightly familiar with since I had build a 3018 mill already. I have done some milling however for now the projects were just for friends and not things I could share. I could have just placed the 5.5W later module into my existing 3018 frame however I didn't want the hassle of swapping parts all the time nor did I want to run a laser without protection. Since I had a blue laser I used 2mm red acrylic panels and an extra small acrylic panel of the exact opposite wavelength than my laser (lot more expensive so not suitable for the whole shroud).
I lucked out with the settings for my laser and the ones I used where: variable power with 25% maximum, 1000 mm/s, 5 lines/mm, horizontal.
*list of stuff I used*
Keycaps: R4 height cherry MX compatible keycaps
Laser: 5.5 W blue (450 nm)
CNC frame: 3018 pro
Spray-paint: cheapest local acrylic spray paint (matt black)
Software: Gimp and laser GRBL
if you want to know what I'm doing at the moment you can follow me on instagram: https://www.instagram.com/stevanovich_kaia/