Forged Full Tang Kiritsuke | Knifemaking
Get your Raycon here: http://buyraycon.com/blackbeardprojects for 15% off your order! Thank you!!!
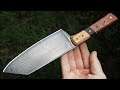
This Kiritsuke is made of k720 aka O2 Steel differentially hardened and tempered to edge hardness between 60 and 65 Rockwell.
Overall lenght is 280mm with 160mm long blade 51mm at the widest and tapered 3mm thickness.
Handle scales are made of stabilized olive wood, wengè and doussie with cork and black felt liners.
Pins are carbon fiber, brass and brass tubing filled with white resin (that looks black) of 3 and 4mm in diameters.
This is not a traditional kiritsuke, it is my interpretation with western style full tang handle construction and bevels ground on both sides. Still a multipurpose chef's knife like the classic kiritsuke.
Looks like I can't get an hamon line on this k720 steel, this process failed already a couple times for this steel but works very well for other like 1070 (c70). It might have to do with the rather long soak time required (between 15 and 20min at 820°c).
Thankfully the acid etch in ferric chloride revelad a cool steel structure that I quite like and almost looks like a very high count damascus. Still a great steel I think!
It took me a while to decide the handle construction this time, this is why I drilled pin holes on tang later on after the heat treatment. I do not suggest this at all, k720 steel is somewhat hard even if not quenched, drilling took a long time and a broken bit.
I also experimented with punge line, ground it off on near the edge to have the entire lenght sharp but also a flat spot between handle and blade for a straight scale glueup. First time for me, I'm sure it has been done before but I have never seen it myself. I like the effect of the plunge line a lot this way, will do it again!
Here are some of the videos where I go in more details about some of the tecniques used in this video:
Stabilizing wood: https://youtu.be/E-P3KWctkk0
Homemade Liners: https://youtu.be/8tIaEAXYv-k
And here are some of the videos about the tools I used:
My hammer: https://youtu.be/2jJOAP3x9es
Hardening oven: https://youtu.be/5MNwqwmrWgQ
Tempering oven: https://youtu.be/uILynSeLuzU
Vacuum pump and chamber used to stabilize: https://youtu.be/BeiW_37rS-U
Rosa drill press: https://youtu.be/BZmqVw7MJsg
Grinder - Buffer: https://youtu.be/8V9f0DIkb90
I just started to list some of the stuff I use for my projects in this amazon storefront:
https://www.amazon.com/shop/blackbeardprojects
It's affiliate marketing, so if you order something from here you'll help the channel for free! Thank you!
Index of operation and materials:
0:13 Coke Forge
0:30 Isolate tang material and thin it down
1:00 Taper front of the blade
1:10 Bend down the tip to counteract bevel forging distortion
1:20 Forge bevels
3:06 Grind profile with 2x72 belt grinder
3:32 Grind round notch with die grinder
3:50 Grind bevels
4:30 Wire wrap to help clay stick on the blade
4:40 Muffler sealer used as clay for differential hardening
5:10 Hardening: Heat to 820°c for 18min and quench in warm 80°c vegetable oil
5:50 Quick wire wheeling to remove loose scales
6:00 Sound check of hardness, high pitch on edge, low pick on spine (softer)
6:10 Tempering: Heat to 200°c for 2hrs
6:24 Center punch pin holes
6:35 Drill pin holes, first two on the top 3mm and others to 4mm
7:06 Grind off some tang material to remove weight and have the knife balance well, also helps with glue adhesion
7:40 Final belt grinder pass to remove scales and save some time hand sanding, keeping the blade cool with water
8:05 Hand sand up to 400 grit
8:33 Etch in ferric chloride
8:50 Buffed with fine steel whool and polishing pads (more done off camera)
9:10 Cut handle materials to size and thickness
9:40 Stabilize wood, check video above for more details
11:30 Scale stack glue up with 5min epoxy resin
12:05 Liners made with thin cork and black felt, check video above for more details
13:40 Glue scales to liners with 90min epoxy
14:20 Match drill pin holes with help of ca glue to hold scales against tang. Works so well!
15:15 Finish top side of scales, as it's impossible to work on after glue up
15:30 Fill a 4mm brass round tubing with epoxy resin and pigments
16:34 Final glueup with 90min epoxy resin
17:10 Clean squeezout with cotton buds infused with nitro solvent
18:18 Hand sand up to 400grit
18:42 White mineral oil as finish
19:00 MadEdge sharpener
19:24 Strop on leather with fine polishing compound
Thanks a lot for watching, I hope you liked the video!
Suggestions and comments are welcome.
Leave a like and share to anyone who might be interested!
★Patreon★
https://www.patreon.com/blackbeardprojects
★Website★
http://blackbeardproject.com/
★Follow me★
Facebook ► https://www.facebook.com/BlackBeardProjects/
Twitter ► https://twitter.com/BlackBeardProje
Instagram ► https://www.instagram.com/black_beard_projects/